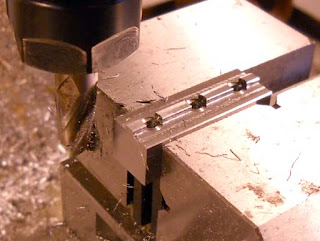
The project started by finally figuring out that the front t-slot of my Taig Mill table would accept #4 nuts. I started with a piece of 1/2" square free machining steel. I faced the top first. Then I picked up the edge.

I started milling a tongue that would fit in the front t-slot of the table to keep the stop horizontal.

Finished tongue. The slot is about .125" wide so I made the tongue about .110The slot fills up with oil, chips, etc so a looser fit seemed like a good idea.

I used an end mill to get below the level of the surface as the drill for a #4 screw is just about the width of the tongue. I then center drilled and drilled through with a clearance drill for a #4-40 screw. The holes are about 1/4" from the ends and 1/2" apart.

I flipped the piece and counterbored for the screw heads with a 3/16" end mill. I'd probably go 1/4" if I made them again as the screw heads were a tight fit.

I sawed the piece in half. I could have just made two pieces to begin with but I really was doing this all off the top of my head.

I faced both ends flat of each stop.

I had to cut the screws to the right length (I use an electricians crimper that has screw shearing holes built in). The parts were deburred.

As you can see the #4 hex nut is a sliding fit in the t-slot. I'm a bit worried it will catch but so far it works fine. Maybe in the future I'll make a flat nut the full length of the stop.

The finished stop. While two screws probably would hold fine, 3 seems better. It's a bit of a pain to loosen three screws per stop but I definitely don't want it to shift and I don't want to have to over tighten the screws either.Seems rock solid and repeatable (there's a degree of feel) to a few thou. Chips caught between the stop and the post will likely be an issue though.
Also posted as an article at Cartertools.com
No comments:
Post a Comment